Showing posts with label eggless. Show all posts

Friday, September 2, 2011

Whole Wheat Garlic Knots


As many of you will most certainly know, I think Joy the Baker is pretty rad. So, when Tracie (of Tracie’s Tastie Treats) and I were searching for something new to make, her blog was an obvious choice. On this particular day, our usual sweet fare just wasn’t appealing to us, so we decided to venture into the savory with these Whole Wheat Garlic Knots. The process of making the knots was fun, and they ended up looking very pretty. They were great on their own, but found they paired beautifully with my homemade spaghetti (post coming soon). I have to admit, stepping into the world of savory baking made me feel pretty legit. Enjoy!


Whole Wheat Garlic Knots (from Joy the Baker)

What you need…

·         1 package active dry yeast, about 2 1/2 teaspoons
·         1 cup warm water (just warmer than body temperature)
·         1 cup whole wheat flour
·         1 1/2 cups all-purpose flour
·         2 tablespoons olive oil
·         1 teaspoon sea salt
·         2 teaspoons sugar
·         For the garlic mixture:
·         4 to 6 cloves garlic, peeled and minced
·         2 tablespoons melted butter
·         2 tablespoons olive oil
·         1/4 cup chopped parsley
·         1/2 teaspoon sea salt
What to do…
1. In a small bowl, dissolve yeast and sugar with warm water.  Let sit for 5 minutes until yeast is frothy.  That means it’s alive and ready to go.
2. In a large bowl, whisk together flours and salt.  Create a small well in the center of the flour mixture.  Pour in the yeasty water and add oil.  With a fork, mix the wet ingredients into the dry ingredients.  If the dough is too sticky, add more all-purpose flour.  Dough should be slightly sticky, but not stick to your hands too much.\
3. Knead dough on a lightly floured surface for about 5 minutes.  Place dough in a large greased bowl.  Flip the dough over to coat the dough.  Cover with plastic wrap and a clean kitchen towel, and leave to rest in a warm, draft-free place for 1 hour, or until the dough is doubled in size.  At this point, you can make the garlic knots, or let the dough rise in the refrigerator overnight.  Just bring the dough to room temperature before rolling it out.
4. When ready to prepare the garlic knots, roll out dough on a lightly floured surface.  Roll into a 10-inch by 10-inch square.  Roughly…. it doesn’t have to be perfect.  Use a pizza cutter to slice 10 1-inch stripes.  Tie a knot in the center of the dough, and wrap the ends under and around the knot.  This doesn’t have to be perfect either… just make sure that the dough is all tucked into itself.  Cover with clean kitchen towel and let rest for 30 minutes.
5. Place racks in the center and upper third of the oven and preheat oven to 400 degrees F.   Line two baking sheets with parchment paper.  Place dough knots on prepared baking sheets and bake for 15 to 18 minutes, until golden brown.
6. While bread bakes, in a large bowl whisk together minced garlic, butter, olive oil, parsley and salt.  When rolls come out of the oven, immediately toss them in the garlic butter mixture.  Toss until coated and remove from the butter bowl.  Serve rolls warm.
Rolls are best served the day they’re made, but will last for 3 days if well wrapped.  Just reheat in a piece of foil in a 350 degree F oven for 10 minutes.
Tracie and I seem to always bake with wine...

...and cheese

Kneading the dough

Pre-baked garlic knot

Butter, garlic and parsley? Yes, please.

I'm not gonna lie, these are some pretty sexy garlic knots


Tuesday, June 21, 2011

Baby D's Eggless Chocolate Cake

So, I know it’s been awhile (miss me?) but I have my energy and creative juices up and ready to start working again.

With that, my first offering is the lovely (pink) cake I made for my nieces birthday. As I’ve mentioned before, the little princess can’t eat eggs but a little thing like that is certainly not going to keep Ms. D from getting her dream birthday cake. DeeDee requested a chocolate cake with whipped cream frosting. And she wanted it pink. Needless to say, Auntie delivered.

The cake is very moist, but a little lacking in flavor. Next time I make this cake I’m going to add some cinnamon and chili powder to help make the flavor a little more interesting. The cake itself is vegan, so feel free to leave off the whipped cream or substitute a different frosting for a lovely vegan option. 


Recipe and more pictures after the jump 

Friday, January 14, 2011

Strawberry Scones


This is one of those recipes that I’ve made before and keep returning to. I have made them as a great addition to morning meetings (everyone needs a little help in the AM), or a treat at family breakfasts (they’re eggless and my niece adores them). They’re easy, fruity, moist and not too sweet. Mine definitely don’t look as pretty as the ones on Confessions of a Tart, but I trust that in time, I will become a master of the scones.

Strawberry Scones (From Confessions of a Tart)
(makes 6 large scones or 12 minis)

What you need…

1 cup strawberries (or other fruit)
3 tablespoons granulated sugar
2 cups all-purpose flour
2 teaspoons baking powder
1/4 teaspoon salt
6 tablespoons butter, in cubes, slightly softened
2/3 cup half-and-half or cream or cold buttermilk

Topping:
1 tablespoon sugar

What to do…

Preheat oven to 400 degrees F. Lightly grease a cookie sheet.

If using larger fruit, cut into bite-sized pieces. Sprinkle fruit with 1/2 tablespoon sugar; set aside. Be sure to make the pieces small, or they tend to fall out of the dough. They'll still be plenty prominent in your finished scones.

Combine remaining sugar with flour, baking powder and salt. Add butter, using a pastry cutter or 2 knives to cut in butter (you may want to use your fingers to be sure butter is evenly mixed into flour). Stir in fruit; then add cream/half-and-half/buttermilk all at once. Use spatula to gently stir dough until it holds together.

Turn onto a lightly floured surface and knead a few times to incorporate dry ingredients. Be gentle so you don't break up the berries and don't overwork the dough. Sprinkle dough with flour if it gets sticky.

Press (pat) the dough into a circle 3/4 inch thick. If any berries peek out, push them into dough. Cut circle into 6-8 wedges, then transfer wedges to the cookie sheet, leaving at least 1/2 inch of space between them. Bake 15 minutes.

Sprinkle with sugar and bake 5-10 more minutes or until the tops are beginning to brown and spring back when you push them. 

Sprinkling the part-baked scones with sugar on Christmas Eve

Super pretty? No. Delicious? Yes.


Monday, January 10, 2011

Citrus-Butter Cookies


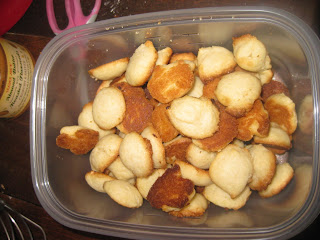
Sometimes I spontaneously feel like making something and will search through my recipes to find something that I can make with whatever I happen to have in my fridge and pantry. That was the case the first time I made these Citrus-Butter Cookies (originally Lemon-Butter Cookies, but the last time I made them I only had limes, so I had to be a little flexible), but I found they were so delicious I could not stop eating them (I may have a problem). When I first moved into my new apartment, I had that same craving for something baked and whipped these out in no time. They’re butter cookies, so they’re not too sweet and they’re eggless, if that is a concern for you. They also don’t spread in the oven so they end up looking like cute little buttons of golden deliciousness (how’s that for a description? Food critics, eat your heart out).

Citrus-Butter Cookies (from Mixingbowl.com magazine, 2010)

What you need…

1 cup butter, softened
¾ cup granulated sugar
2 teaspoons finely shredded lemon peel (though lime works as well and I also imagine orange is tasty too)
2 cups all-purpose flour
Powdered sugar (optional)

What to do…

Preheat oven to 350 degrees F. In a large mixing bowl, beat butter with an electric mixer on medium speed for 30 seconds. Add granulated sugar; beat until mixture is combined, scraping side of bowl. Beat in lemon (lime/orange) peel. Beat in as much of the flour as you can. Stir in remaining flour.

Drop dough by rounded teaspoons 2 inches apart onto an ungreased cookie sheet. Bake for 15 minutes or until edges are light brown. Transfer to a wire rack. If desired, sift powdered sugar over tops of cookies. Makes 60 cookies. 

The original recipe

About to go into the oven

Little buttons of happiness

The spice pantry in my new apartment ROCKS

Thursday, December 23, 2010

Holiday Cookies!

Today my mama and I made several different types of cookies for Christmas: Thumbprint Cookies, Fairy Drops (no, I have no idea why they are called that) and Oatmeal Crispies. The Thumbprint cookies have always been a holiday treat in my family, we made the Oatmeal Crispies for my niece who cannot have eggs, and I don't know where the Fairy Drops came from, but they have a cool name.

Thumbprint cookies (no nuts)

Fairy Drops topped with sprinkles and sugar & crushed candy canes

Oatmeal Crispies dough...the first cookies I've ever made in a pot over the stove

Completed cookies while still baking

Holiday spread


Recipes after the jump...